
RV power adventures ensure comfort, convenience, and safety. The fundamentals of power pedestals and RV outlets are what one must know to have their electrical system working and running properly for their travel. Whether you are a first-timer in owning an RV or simply enjoying another road trip, this little guide will cover all the essential information to keep your RV properly connected and powered. From matching up with the right types of outlets to understanding how to hook up electricity at a campground, we will provide all the tips and tricks to help you avoid common mishaps and just enjoy your experience. Let us put you in control of the wiring needs and power up your adventures like a pro!
Understanding RV Pedestal Wiring

What is RV Pedestal Wiring?
RV Pedestal wiring is the set of wiring connected to supply power to an RV for a campground or a parking area. These power pedestals, popularly known as “RV pedestals,” provide the electricity mainly to the RVs. These pedestals come with standardized receptacles to allow a safe and efficient means of power supply to the RVs. Frequently, an RV pedestal offers three outlet configurations: 50 amp (240 volts), 30 amp (120 volts), and 15/20 amp (120 volts). Knowing these outlets is crucial to guarantee compatibility with the RV’s setup.
Did You Know? According to some recent statistics, more than 80% of modern campgrounds in the U.S. are equipped with 30 amp and 50 amp pedestal outlets for RV use, accommodating the majority of RVs that are out there.
However, before plugging in, it is even more important to check if the pedestal is properly grounded and functioning. It is highly advisable to run a circuit analysis or connect your RV through a surge protector; this will help identify faults, and also protect your RV electrical systems from surges, low voltage, or reverse polarity that are commonly found with campground pedestals.
Having knowledge about the wiring of RV pedestals will ensure the safety of your RV’s appliances, electronics, and really good camping experience without having to deal with sudden power failures or interruptions. Always check what your RV requires and use the proper adapter or connector to suit the available pedestal configuration.
The Importance of Proper RV Wiring
The proper wiring of your RV is essential to ensure the safe operation of its electrical systems. It also protects sensitive appliances and electronics from electrical problems such as surges, low voltage, or incorrect polarity. Proper wiring also minimizes the risk of electrical fires and system failures, so you have peace of mind while cruising or camping.
Sometimes power loss is experienced on the road if wiring is not properly done. Improper wiring gives way to sudden power losses that spoil camping experiences and may even lead to expensive repairs. If you have your system checked for wiring by a professional so that it meets code regulations and will operate well with campground pedestals, such problems become a thing of the past while opening gates for opportunities where you can bank on dependable power that attends well to all your power needs.
Using the correct adapters, connectors, and surge protectors rated for your RV’s electrical loading is part of keeping the RV wiring safe and efficient. Always check the power source and ask an expert for help if you are unsure about its compatibility. An RV maintained according to electrical safety standards is not only safe but also protects the life of appliances, making the entire journey trouble-free.
How RV Power Pedestals Function
RV power pedestals are the connection points between the external electric power source at campsites or RV parks and your RV. Outlets with standard voltage levels, usually 20-amp, 30-amp, or 50-amp service, are typically on the pedestal. The compatible power cord carries the power from the pedestal to the RV electrical system needed to run appliances, lighting, and other electrical devices. The power pedestals are built to safely distribute power while accommodating diverse configurations of RVs. These usually include breakers or fuses to prevent overloading or faults. Some pedestals offer features like surge protection, hose outlets, and lighting to enhance functionality and user-friendliness. Ensuring that your RV is compatible with the power rating of the pedestal is very important for the stable and safe operation thereof.
Pre-Connection Checklist
Before plugging in an RV power pedestal, check to make certain there is no damage on the outlet and that the voltage is correct using a voltage tester. Be sure to use properly rated adapters and extension cords available for the job at hand. Be attentive to power consumption so as not to blow breakers while keeping cords nicely stowed away to avoid damage. A little bit of proper use of RV power pedestals can save you from a cold evening out in the woods and shores all the way to the safety and comfort of your home-on-wheels.
Troubleshooting Common RV Wiring Issues
Identifying Power Fluctuations
Power fluctuations in an RV can generally cause intermittent power supply, dimming of lights, or some appliances to malfunction. The first step toward solving the problem is to check all the connections and wiring for visible damages or loose fittings. Examine the power cord for any signs of wear or fraying since a damaged cord may disrupt the consistent flow of electricity.
Continue to check the power pedestal or generator for faults. Use a voltage meter to ensure that the voltage output remains stable and within an accepted range. Unstable or low voltage could hamper the functioning of your equipment inside the RV and may warrant intervention from the campground or generator provider.
Next, investigate the breaker panel and fuse box of the RV itself if the problem still continues. Blown fuses and tripped breakers are oftentimes behind power fluctuations and can mostly be fixed simply by resetting the breaker or replacing the fuse themselves. Recurrent problems, however, may call for further probing and repairing by a professional. Inspection and upkeep are good practices that can avert any power interruptions during your days out on the road.
Fixing Faulty Breakers in RV Power Systems
Problems with breakers in the power system of an RV can negatively affect it, the light appliances taking a blow, and in the worst cases, complete power loss. Identification of the problem starts with understanding the symptoms of a bad circuit breaker; these include frequent tripping, unusual heat emanating from the breaker’s surface, or visible damages such as charring. A recent guide on RV power maintenance suggests that approximately 80% of all RV electrical problems are due to the wrong load or a breaker that has come to the end of its lifespan, hence stressing the need for regular checks.
Safety First
To handle defective breakers, make sure that the RV is disconnected from any external power supply to keep shocks at bay.
Afterward, use a multimeter to test the breaker believed to be faulty. An inconsistent flow of electricity is grounds for replacing the breaker. Replacement requires the damaged breaker to be taken out of its panel and the matching new breaker installed in its place, making sure it conforms to the amperage requirements specified for the circuit. When in doubt as to compatibility, make reference to your RV’s electrical manual or seek professional advice.
Apart from that, breaker maintenance remains important in the long run. Cleaning the breaker parts and checking for loose wire connections every now and then is a great way to avoid trouble. Energy-saving modern RVs now come equipped with breakers that communicate through smart monitoring systems to alert owners to stops or problems before full failure. Where possible, integrating these updates can prove far-reaching in respect of reliability and performance.
Addressing Loose Connections in RV Outlets
With loose connections in RV outlets result electrical hazards that may include the flickering of lights to places where it can be unsafe-the outlets can overheat and cause fire. RV outlets are subjected to all kinds of vibration while in transit, and hence, they tend to loosen with time more than the stationary outlets in homes.
To solve the problem, ensure that the power supply to the RV is switched off first, and then check the outlet for any obvious sign of damage or wear. Tighten any screws that seem to be loose attaching the wires to the terminal of the outlet by using a screwdriver. According to recent reports and recommendations on electrical safety, about 13% of the electrical malfunctions in campers result from loose wires or outlets not secured properly within the system.
They can also install tamper-resistant or heavy-duty outlets especially suited for RVs to make sure no one tampers with the outlets or heavy use will wear them down fast. More campers are going for surge-protected outlets to protect sensitive electronics. Connections ought to be checked regularly to ensure they are secure, particularly post-long distance traveling and bumpy road conditions.
Modern Solution: For monitoring, today there can reduce smart outlet analyzers; they not only warn of loose connections but also indicate the current flow and voltage drops. Knowing these proactive steps will go miles toward making RVs safe and fully functional in their electrical system.
Maintenance Tips for RV Pedestal Wiring
Regular Inspections and Cleaning
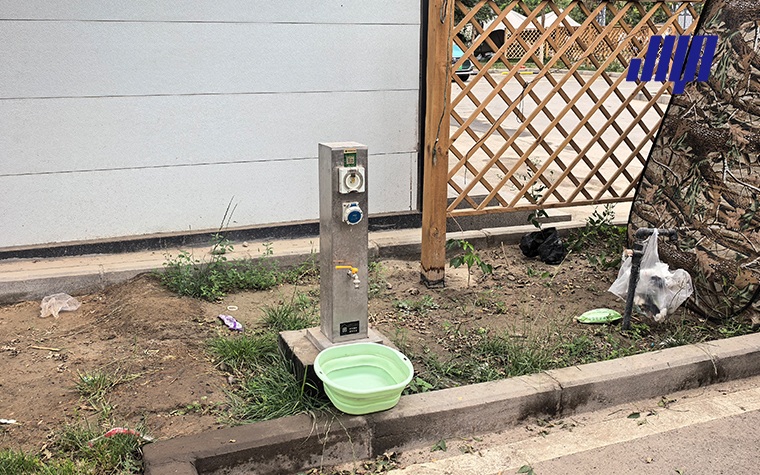
Maintaining your RV pedestal wiring in tip-top condition begins with regular inspection and cleaning of the whole hardware. Wear and tear on the pedestal surface or corrosion marks out of the ordinary would be key signals to stop. With all due caution, cleaning the pedestal or plugs is a best approach to avoid such fallout. Take a dry cloth or a contact cleaner to clean the plugs and remove dust or foreign debris, which will aid in maintaining good conductivity through the connections.
Also, watch for any loose wiring or parts that are burned out. Watch out for any melted or obstructive areas on the power cords or plugs that signify overheating. If you want to prevent voltage drops, which is why a careful cleaning and functioning of the pedestal is important, consider apple-facing impedances that could damage sensitive appliances such as air conditioners and refrigerators. Usually, experts warn checking at least every month or right before every trip to ensure the electrical system is safe and in good working order.
Upgrading Outdated Wiring Components
Because hazardous wiring has been ruled out, changing outdated wiring parts must be a priority to ensure the safe and efficient operation of your electrical system. Old or worn wiring can overheat, cause short circuits, or even act as a fire hazard. Modern wiring materials are manufactured to bear greater electrical loads, allowing improved energy efficiency and the diminution of dangerous incidents. Replacing the dated components allows for protection of your appliances and undoes costly repairs in the long run.
Also, the new wiring components provide better compatibility with modern devices and appliances. Older systems might not have been designed to handle energy-efficient technologies or high-performance electronics from today. The upgrades usually feature circuit breakers and surge protectors, thus further enhancing safety and functionality; hence, constant power delivery will protect your delicate equipment from voltage fluctuations.
Upgrades carried out are also in conformity with the modern safety standards and building codes, which raise the overall value of the property. If the wiring in your home or RV shows signs of deterioration here and there, such as exposed wires, frequent power interruptions, etc., you’re being told loudly and clearly that it needs an upgrade! Have a qualified electrician examine your system to best recommend upgrades that will suit your needs, ensuring that it will be around for a long time in service.
Extending the Lifespan of Your RV Wiring
Proper maintenance and care will lead to extending the lifespan of your RV wiring and road safety. Some important tips for maintaining and safeguarding your electrical system are:
- Regular Inspections: Wiring should be examined at regular intervals to stuff like frayed cables, corrosion, or loose connections. Lately, an estimation ranks nearly 24 percent of RV electrical failures through neglect of routine maintenance.
- Use a Surge Protector: Power surges will kill the electric system of your RV. A good-quality surge protector will save your system from voltage spikes whenever connected to campground power sources-an often-encountered problem of RV owners.
- Strict Connections: Loose connections of wires create heat buildup that poses a potential fire hazard. Sometimes a check with a screwdriver to tighten connections can save damage from occurring.
- Upgrade Old Wiring: If your RV wiring is old or aluminum (typical of older models), consider the upgrade to copper wiring. It is much more sturdy, good electrical conductor, and less prone to corrosion.
- Avoid Overloading Circuits: Modern appliances require so much power above what an older system can safely handle. Ensure you are well informed about the load capacity of your electrical system and never load beyond it. In other words, an overloading circuit would be overheating and damaging.
- Protect Wiring from Rodents and Pests: Rodents tend to chew the wiring insulation, exposing wires and causing electrical faults. Use some wire-concealing materials or any type of pest deterrents so that rodent menace will not materialize.
- Store Your RV Appropriately: Wetness and temperature extremes cause wear to electrical components more quickly. Store the RV at a covered or a climate-controlled location, saving the delicate wiring system from being deteriorated by environmental conditions.
- Swap to LED Lighting: Making the switch from incandescent bulbs to energy-efficient LED lights lessens energy demand on your system, thereby prolonging the lifespan of your wiring by cutting power use and heat generation.
All of these tips are in keeping with an attitude of maintenance-a way to avoid costly repairs, minimize the instances of electric failure, and outlast any RV in road readiness for years to come.
Expert Insights and Recommendations

Advice from Electricians on RV Wiring
In the interest of ensuring safe and well-functioning installation of your RV wiring systems, maintenance and upgrades must be well carried out. Electricians are unanimous that you need to first inspect your electrical appliances in your RV thoroughly at least once a year. Such an annual inspection looks for signs of wear and tear, corrosion, or anything else suspicious like loose connections that could result in electrical malfunctions or fire hazards. Regular checks are imperative so that smaller issues can be nipped in the bud before turning into expensive rectifications.
The second piece of advice given would be to not overload the electrical system of your RV. Overloading occurs when too many appliances draw too much power at the same time for the system to handle. Electricians recommend calculating the total wattage of all the appliances being used and relating that to the power capacity of the RV. Energy-efficient appliances should be used as a matter of practice, and switch off those appliances that are not in use to keep the system within safe limits.
Lastly, surge protectors and circuit breakers made specifically for RVs are generally agreed upon by travelers as upgrades for every RV. The surge protectors protect the system from power spikes which could damage sensitive electronics, whereas good circuit breakers protect against overload by shutting down the power whenever needed. Following these basic guidelines will bring about enhanced safety and will go a long way in extending the life of the electrical system in your RV, thus ensuring a worry-free traveling experience.
Best Practices for Safe Installation
Always begin by turning off the power supply for installing electrical components in your RV to avoid any hazards. Make sure to keep your working area dry and well-lit, using tools suited to the installation process; an unsafe working environment is something you want to avoid.
Check for the manufacturers’ instructions for each and every component being installed. These guidelines are created to ensure compatibility and proper function. It is equally important to use parts and accessories that are certified to be safe, since non-certified ones may fail under stress, resulting in costly repairs or the risk of injury.
Lastly, you should consider hiring a professional if uncertain about the installation process or if you do not have any prior experience working with electrical systems. A professional technician will ensure that all components are installed properly and may even identify more underlying problems. This would act as a safeguard for your RV, as well as ensure some peace of mind for you while traveling.
Essential Tools for RV Pedestal Wiring Projects
While RV pedestal wiring projects are underway, having the right tool is essential if one truly wishes to complete the task with safety and effectiveness. Having before embarking on a project are some tools every hobbyist or professional must have:
For trimming and stripping wires to the right length without damaging the wiring.
A voltage tester is used to ensure the absence of live current, whereas a multimeter measures voltage, continuity, and resistance for more detailed diagnostics.
A complete set of flathead and Philips screwdrivers and nut drivers help in tightening connections and securing components.
This helps in insulating wire connections against moisture or wear; they can also reduce the chance of an electrical fault.
Further, a power drill with several drill bits and terminal crimping tools would be very handy in making sure the connections are firm and well-secured.
Important: Before initiating the project, check if your tools meet industry standards and are in good working condition. Old or substandard tools not only hamper the working process but may also pose serious safety hazards. With the right tools and systematic steps, the wiring of your RV pedestal will be accomplished in a much more timely and safe manner.
Safety Considerations in RV Wiring

Turning Off Power During Installation
Prior to undertaking any RV electrical wiring, ensure that power is disconnected to prevent safety hazards. First, disconnect the RV power from the pedestal or generator. Follow this by double-checking with a voltage tester to confirm that residual electricity does not remain in the system.
Running the power-system while working on it can cause severe injuries or hazards like electric shock, burns, etc. It might also damage your RV electrical system, and repairs can be costly if that the case. Hence, making sure power is disconnected as soon as one touches any wire not only safeguards you but also helps keep the durability and reliability of your installation.
Furthermore, inform or clearly mark that the power has been disconnected to avoid accidental power reconnect. If you are working on shared power in public areas, ensure a power lockout/tagout (LOTO) is in effect. Such safety measures will assist in maintaining a safe environment throughout the installation process.
Compliance with Local Electrical Codes
Local electrical codes shall be adhered to ensure the safety, functionality, and legality of an electric installation. These codes offer straightforward guidelines that are established to limit practices that could pose hazards to some extent, such as electrical fires or electrical shock hazards. Therefore, while planning work, always seek out codes applicable to the locality where your project is situated: codes can vary considerably across different regions and different types of buildings.
To accomplish code compliance, make sure that all materials, such as wires, outlets, and circuit breakers, meet the minimum requirements of the codes. Also, design criteria such as wiring layouts, grounding, and circuit protection shall be sufficiently considered for code compliance. This includes labeling of circuits and approved methods of making connections and installations; failure to comply may result in failed inspections or removal and reinstallation of work.
Working with licensed electricians or professionals familiar with current codes is imperative. Local inspectors play a significant role in determining compliance during inspection. Thus, adhering to safety-regulated installation standards ensures that the electrical installation will be safe, reliable, and efficient. Avoid unnecessary risks and penalties by always adhering to the local authority’s rules.
Using Quality Materials for Safety
The relevance of good products for an electrical installation cannot be stressed enough. Good-quality wires, breakers, outlets, and switches yield a very high standard of installation performance, in addition to also minimizing the chances of electrical failures, fires, and other hazards.
While purchasing materials, it is beneficial to look for certifications such as UL (Underwriters Laboratories) or the Canadian Standards Association (CSA) marks that assure the products meet rigorous safety and performance levels. Copper wiring is normally recommended in preference to aluminum because it is an excellent conductor of electricity and does not easily get heated up; this thus prevents overheating. To go further with safety, in areas where moisture may be present, namely kitchens and bathrooms, GFCI (Ground Fault Circuit Interrupter) outlets should be installed as they detect faults and discontinue the flow of current in less than 1/40 of a second.
Investment Perspective: Although all elegant, sturdy, and standardized materials may come with somewhat of an initial price tag, they will definitely save you further costs for repairs, replacements, and more dangers. There is an undeniable fact proven by research that high-quality and rightly installed electrical materials will go on to prolong the lifespan of a system by 20-30%. Hence, it is very necessary and very basic that one has to prefer quality over cheapness for a safe and reliable electrical installation.
Frequently Asked Questions (FAQ)
Q: What is RV pedestal wiring?
A: RV pedestal wiring refers to the electrical setup at RV sites that provides power to recreational vehicles. This involves connecting the RV to a dedicated electrical outlet, often a 50-amp or 30-amp service, allowing for safe and efficient power supply.
Q: What are the electrical requirements for a 50-amp RV pedestal?
A: A 50-amp RV pedestal typically requires a 240V supply with two hot wires (L1 and L2) and a neutral wire. According to NEC 551.73, the correct wire size for a 50-amp circuit should be at least 6 AWG copper or 4 AWG aluminum to handle the load efficiently.
Q: Can I install RV pedestal wiring without a licensed electrician?
A: While some DIY enthusiasts may attempt to install RV pedestal wiring themselves, it is highly recommended to hire a licensed electrician. This ensures compliance with NEC regulations and safety standards, particularly for 50-amp outlets and proper grounding.
Q: What is the difference between a 30-amp and a 50-amp RV outlet?
A: A 30-amp RV outlet typically provides 120V and is suitable for smaller RVs, while a 50-amp outlet delivers 240V and is designed for larger RVs with higher electrical demands. The 50-amp setup uses two hot wires, allowing for more power availability.
Q: How do I determine the appropriate wire size for RV pedestal wiring?
A: The appropriate wire size for RV pedestal wiring depends on the amperage and distance. For a 50-amp service, use a minimum of 6 AWG copper or 4 AWG aluminum wire. Always consider the demand factor and future expansion when selecting wire sizes.
Q: What is the purpose of a conduit in RV pedestal wiring?
A: A conduit is used in RV pedestal wiring to protect electrical wires from physical damage and environmental factors. It also helps organize the wiring and ensures compliance with NEC standards, providing a safer installation.
Q: What is gfci protection, and is it necessary for RV pedestal wiring?
A: GFCI (Ground Fault Circuit Interrupter) protection is essential for RV pedestal wiring to prevent electrical shock hazards. It monitors the electrical current and disconnects power if an imbalance is detected. This is particularly important in outdoor settings.
Q: What is a main breaker panel, and how does it relate to RV pedestal wiring?
A: A main breaker panel is the central hub for electrical distribution in a building or RV site. It connects to the RV pedestal wiring and is responsible for controlling the flow of electricity to various circuits, including the RV outlets.
Q: How can I ensure my RV is compatible with the pedestal wiring?
A: To ensure compatibility, check the RV plug type and the pedestal outlet specifications. Most modern RVs are equipped with NEMA 14-50 plugs for 50-amp services. Verify that the electrical panel within the RV is also designed to handle the incoming voltage and amperage.
Q: What are the benefits of using aluminum wire for RV pedestal wiring?
A: Aluminum wire is lightweight and generally less expensive than copper wire. For RV pedestal wiring, using aluminum can be advantageous for larger installations, like a 200-amp system, as long as the appropriate wire size and connections (e.g., lugs) are utilized to ensure safety and efficiency.
References
-
Truck Stop Electrification as a Long-Haul Tractor Idling Alternative
This document discusses RV-style power pedestals and their applications.Read more here -
Electrical Wiring in RV Parks
This paper covers the business and technical aspects of wiring and equipment installation in RV parks.Read more here -
Interstate Electrification Improvement Project
This project includes insights into wiring and power pedestals for RVs and other vehicles.Read more here

About the Author
Emily Richardson
Senior Technical Writer, Jiya
Emily has over 12 years of experience in marina systems and industrial equipment. She works closely with engineers and project teams to translate complex technical topics into practical guidance for operators, installers, and procurement professionals worldwide.